ShopDreamUp AI ArtDreamUp
Deviation Actions


![[Morgan le Fay] Vestiges - Steps](https://images-wixmp-ed30a86b8c4ca887773594c2.wixmp.com/f/8ee051fd-774f-41e4-8f59-85d58425df90/da7g9ft-e8dcfc39-05f4-4fcb-a008-b1bf8528633f.png/v1/crop/w_92,h_92,x_0,y_34,scl_0.13549337260677/_morgan_le_fay__vestiges___steps_by_aliciane_da7g9ft-92s.png?token=eyJ0eXAiOiJKV1QiLCJhbGciOiJIUzI1NiJ9.eyJzdWIiOiJ1cm46YXBwOjdlMGQxODg5ODIyNjQzNzNhNWYwZDQxNWVhMGQyNmUwIiwiaXNzIjoidXJuOmFwcDo3ZTBkMTg4OTgyMjY0MzczYTVmMGQ0MTVlYTBkMjZlMCIsIm9iaiI6W1t7ImhlaWdodCI6Ijw9MTY4MCIsInBhdGgiOiJcL2ZcLzhlZTA1MWZkLTc3NGYtNDFlNC04ZjU5LTg1ZDU4NDI1ZGY5MFwvZGE3ZzlmdC1lOGRjZmMzOS0wNWY0LTRmY2ItYTAwOC1iMWJmODUyODYzM2YucG5nIiwid2lkdGgiOiI8PTY3OSJ9XV0sImF1ZCI6WyJ1cm46c2VydmljZTppbWFnZS5vcGVyYXRpb25zIl19.B5I__kNStgMCFnJ8vV0f75wYEiiFZAfnO5Lauf2ztXw)
Suggested Deviants


Suggested Collections


You Might Like…


Featured in Groups


Badge Awards
Description
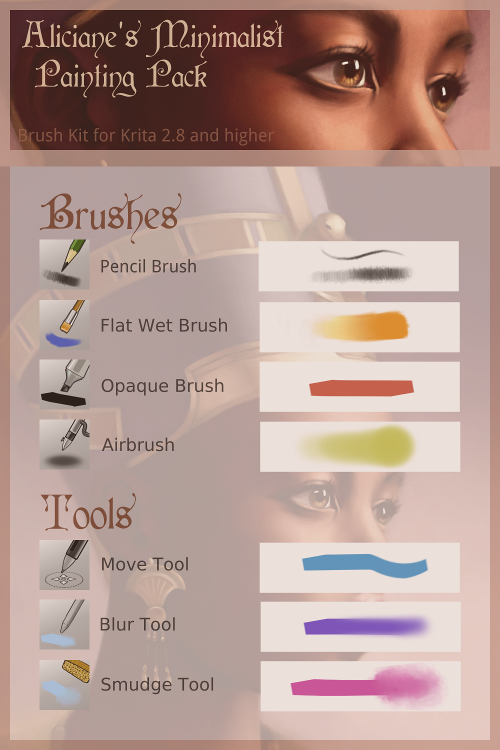
Minimalist Brush Pack
Content : Brush presets
Software : Krita 2.8 and higher
EDIT : HERE is a bundle with two additional brushes I've been asked about in the comments. The presentation is less pretty than the rest of the pack, so feel free to change their icon for whatever you want")
Installation : The installation process is different than the rest of the pack. To import it, go to "Settings -> Manage resources" and then click on "Import bundle".
Content description : Both brushes are variations of my main "Flat Wet Brush". I use them to paint some organic details such as leaves, grass and clouds.
Installation : Open Krita's resource directory by going to Edit > Resources > Open Resources Folder. Go into the "paintoppreset" subfolder. Unzip the .kpp files into it. Restart Krita.
Content description : Here is a quick explanation of how I use each of these presets.
Pencil Brush
I use it at small size to sketch my underdrawings. With a larger size it can be used to simulate shading with the side of a graphite pencil.
Flat Wet Brush
My main brush, I literally use it 90% of the time. At high pressure it lays down the colour and at a lower pressure it gently blends the colours. Beware as it uses the colours from the layers underneath to create the resulting blended colour. Recommended for a painterly look with few layers. This is an extremely quick and efficient tool for me, it saved me a lot of time. Plus it has a slight bit of texture in it (Smile)")
Opaque Brush
A brush without pressure sensitivity ! I use it to block-in my colours in early stages when I need them to stay fresh and clean.
Airbrush
Your good old regular airbrush. I only use it for special effects, usually on layer modes such as overlay or increase/decrease saturation. It is useful for minor, discrete corrections thanks to its very soft edges.
Move Tool
A very handy brush which will grab and distort/push what's inside its radius. It is very useful to make quick corrections when something is slightly misplaced.
Blur Tool
Applies a local Gaussian blur. I generally use it when I need to put something out of focus or to get a really really clean blending. Don't overuse it as it can quickly look too soft. Use the next one instead.
Smudge Tool
This textured smudge tool is very useful to refine a blending. It should only be used gently and carefully to smooth an already existing transition; the flat wet brush should be sufficient in most cases. Beware as it is very powerful, use it by tipping with your stylus like you would with a sponge, do not make long strokes ^^
Content : Brush presets
Software : Krita 2.8 and higher
For some people, including myself, it can be a bit overwhelming to try a new software because of all the tools, the brushes and the options to play with.
I've started to use Krita a few months ago and after a few weeks of experimentation, I've realized that, in the end, I was only using those 7 tools. Therefore I'm sharing my very small brushset with you, hoping that it might help you to get familiar with the software easily without being side tracked by all the possibilities
Most of these brushes are very slight variations from default tools or from brushes by Deevad. Check his profile to find a lot more Krita brushes !
EDIT : HERE is a bundle with two additional brushes I've been asked about in the comments. The presentation is less pretty than the rest of the pack, so feel free to change their icon for whatever you want
Installation : The installation process is different than the rest of the pack. To import it, go to "Settings -> Manage resources" and then click on "Import bundle".
Content description : Both brushes are variations of my main "Flat Wet Brush". I use them to paint some organic details such as leaves, grass and clouds.
Installation : Open Krita's resource directory by going to Edit > Resources > Open Resources Folder. Go into the "paintoppreset" subfolder. Unzip the .kpp files into it. Restart Krita.
Content description : Here is a quick explanation of how I use each of these presets.
Pencil Brush
I use it at small size to sketch my underdrawings. With a larger size it can be used to simulate shading with the side of a graphite pencil.
Flat Wet Brush
My main brush, I literally use it 90% of the time. At high pressure it lays down the colour and at a lower pressure it gently blends the colours. Beware as it uses the colours from the layers underneath to create the resulting blended colour. Recommended for a painterly look with few layers. This is an extremely quick and efficient tool for me, it saved me a lot of time. Plus it has a slight bit of texture in it
Opaque Brush
A brush without pressure sensitivity ! I use it to block-in my colours in early stages when I need them to stay fresh and clean.
Airbrush
Your good old regular airbrush. I only use it for special effects, usually on layer modes such as overlay or increase/decrease saturation. It is useful for minor, discrete corrections thanks to its very soft edges.
Move Tool
A very handy brush which will grab and distort/push what's inside its radius. It is very useful to make quick corrections when something is slightly misplaced.
Blur Tool
Applies a local Gaussian blur. I generally use it when I need to put something out of focus or to get a really really clean blending. Don't overuse it as it can quickly look too soft. Use the next one instead.
Smudge Tool
This textured smudge tool is very useful to refine a blending. It should only be used gently and carefully to smooth an already existing transition; the flat wet brush should be sufficient in most cases. Beware as it is very powerful, use it by tipping with your stylus like you would with a sponge, do not make long strokes ^^
© 2014 - 2024 Aliciane
Comments86
Join the community to add your comment. Already a deviant? Log In
The file is not working for me